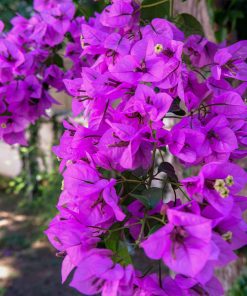
Deep Purple Foliage and Whimsical Pink Blooms
If you’re looking for a flower straight out of a fairytale, the whimsical blooms on the Summer Chocolate Mimosa Tree more than fit the bill! These eye-catching flowers look like white and bright pink fans, with dots of yellow pollen at their tips. Set against the burgundy of the tree’s foliage, your tree will make neighbors and passersby wonder if they’ve entered a storybook.
The Summer Chocolate Mimosa first sprouts with green foliage in spring. These leaves are arranged into paired, slightly-drooping columns, on thin, widely-spaced branches reminiscent of the Mimosa Tree’s Asian origins.
As the months grow hotter, the tree’s green leaves transform into a deep purple, the ideal backdrop for its feathery flower flowers. And these flowers aren’t only ornamental. Not only do they attract birds and other wildlife – these sweet-smelling blooms can be extracted to create “Albizia Calm” – an extract that supports calm and can be used to treat skin irritation and burns.
For all of their tropical beauty and healing properties, Mimosa Trees are extremely easy to grow. They flourish in any soil type and also tolerate periods of drought.
The Summer Chocolate Mimosa is certain to be the most unusual tree on your block. If you’re ready to make a statement, order yours today!
Planting & Care
1. Planting: Your location should have well draining soil and receive full sunlight.Dig your hole twice as wide as the root ball and just as deep. This will allow the roots to spread through the loosened soil in the early stages.
Mix in peat moss with the soil removed from the hole with a ratio of one part peat moss to four parts soil. Sphagnum peat moss will aid in the fertility and drainage of the soil.
Insert the tree into the planting hole and gently spread the roots by combining them with your hands. Gradually back-fill your hole with the amended soil and gently firm the soil down with a shovel. Make sure not to pile higher than the soil level, or crown, where the tree’s roots meet the trunk.
Water your planting site deeply with a slow trickling hose. You’ll want to water enough in order to saturate down to about an inch below the soil.
2. Watering: Water your mimosa tree sparingly, only during excessive dry spells. The peat moss soil mixture will assist with drainage since the tree will not do well with excess water. A steady flow of water from a hose for about 10-15 minutes once every two weeks should be enough. Anything more than that results in diseases related to over watering, like root rot.
3. Fertilizing: When fertilizing your mimosa tree select an all-natural, organic, slow-release tree fertilizer. Fertilize in the early part of the spring growing season when it’s not too hot or cold. Check your forecast to be sure no heavy rainfall will occur within a couple of days of applying the fertilizer.
Excessive rain could wash away a lot of the slow-releasing fertilizer.
Apply to the soil according to the package instructions. Slow-release is granular or pelletized and can be sprinkled around the planting site. Water will gradually soak the nutrients into the soil where your mimosa tree will absorb them over time. Other forms of slow-release fertilizers can be in the form of stakes that insert into the ground near the tree or in a liquid form that can be applied using a sprayer. Water after applying your fertilizer to prevent salt build up, which can burn the tree.
4. Pruning: Your mimosa tree will not require very much attention but could benefit from some minor pruning in the fall season. Remove branches growing along the lower trunk area at a 45-degree angle with sterilized pruning shears just beyond the neck collar (where the limb connects to the trunk). Cutting the neck collar can damage the tree. Removing the lower limbs encourages more growth towards the top of the tree. A pole saw is useful for removing dead limbs, for pruning branches out of reach and for forming the shape of your mimosa’s canopy. Thinner branches should be cut three to five inches from the end of the limb to promote thicker canopy growth.
*Tip: Sterilize your tools after each cut to prevent contamination. Antibacterial soap and/or rubbing alcohol are perfect for cleaning your tools.
| Height | 2-3 ft., 3-4 ft., 4-5 ft., 5-6 ft., 6-7 ft. |
|---|
Fast Shipping and Professional Packing
Due to our longstanding partnership with UPS FedEx DHL as well as other leading global carriers, we are able provide various shipping options. Our warehouse staff is expertly trained and will wrap your goods in accordance to our precise and precise specifications. Before shipping, your goods will be thoroughly examined and secured. We ship to hundreds of thousands of customers each day in different countries. This demonstrates our dedication to become the biggest online retailer in the world. The warehouses are located in Europe in the same way as they are in USA.
Note: Orders that contain more than one item are assigned a particular processing time depending on the specific product.
Prior to shipment, all purchased items will be thoroughly examined. Today, the majority orders will be shipped within 48 hours. The delivery time should be between 3-7 working days.
Returns
The stock market is always changing. It is not managed entirely by us since we have multiple organizations, such as the factory and our storage. The actual stock levels can fluctuate at any point. It's possible that you may not receive your order once the order has been made.
Our policy is valid for 30 days. If it's been more 30 days since you made your purchase and we're unable to offer you a complete exchange or refund.
The item you purchase must be in its original packaging and not be used. The item must be in its original packaging.
Related products